Wednesday, July 18, 2012

A Whale of a Time!

We were lucky to be part of a super cute whale themed birthday party by Sweet Threads Clothing Co!


We needed to figure out how to make whale cake pops and come up with a display.  We were given the graphics for the party to get us started.  Molly came up the idea to paint a box pink and white and do paper waves in navy and bright blue.


The whales took some trial and error.  At first we were making the tail too long so the pop wasn't balanced on the stick.  We finally shortened them up and used a heart sprinkle as the tail.  Then we used black sprinkles for the eyes and drew the mouth.


We liked different shades of blue sprinkles for the balls but added some white as it reminded us of the white tipped ocean waves.


Now we had one last problem.  The party was in Nashville and we are in Kansas City.  To top it off, we are experiencing one of the hottest summers on record.  This meant we needed to figure out the best way to ship cake pops in 100 + degree heat.


We decided overnight shipping was a must to beat the heat.  We used a small box lined with foil, tissue paper and a double layer of bubble wrap.  We also wrapped the cake pops in bubble wrap and put even more if it in between the layers of pops.  Once that was all sealed up we placed it in a larger box with newspaper around it along with the display.  In it went to the deep freeze for 24 hours.  I took it to the post office at the last minute to ensure those whales wouldn't melt!


We shipped extra pops as well so Michelle styled them in Mason Jars.  Mason Jars are always a great & simple way to display cake pops!


Here are a few more pics.  We loved being a part of this party!  Check out our facebook page to see more of our work!


 I've listed the other vendors from the whale party below!  The party was also featured on The Party Wagon, and you can check us out here too!  Project Nursery, Catch My Party, Hostess with the Mostess.

Party Styling: Michele Brown, Sweet Threads Clothing Co
Party Design, Printables, Paper Straws, Mason Jar Lids & Jumbo Balloon: Party On! Designs
Cake Pops: KC Pop Art & Parties
Sippy Cup Party Favors: I Have A Favor
Tutu: Danbury Lane
Headband: Birdie Baby Boutique
Shirt: Sweet Threads Clothing Co

Tuesday, July 3, 2012

Red, White and Blue Party!

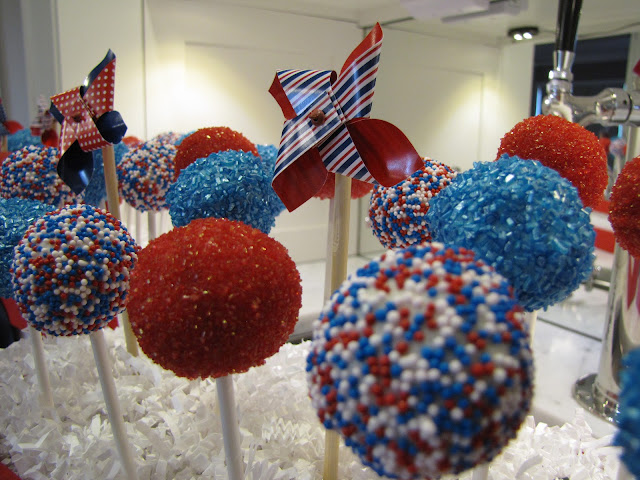
Molly and I were so excited to get an order for a Red, White and Blue themed first birthday party!  We LOVED this color combination!


We wanted to make a display that would look fun and cute since it was for a little girl's first birthday party.  


We came up with the design as we shopped.  We found some crate style boxes and decided to paint them red.  Since there is a space between the boards we thought a white stripe would be really cute and reminiscent of the American flag.  We glued construction paper inside the box and were careful not to rip it when we inserted our foam block.  

We didn't have paper that was long enough so to cover the seam we made a paper burst.  Our blue chocolate sprinkles were a brighter color so we tied it in by making the number one in a lighter blue paper.  The round circle is navy and then we made a paper pinwheel.  Don't you love that red dot paper?!


We found the pinwheels when we were shopping which ended up being the perfect touch for this display!  These colors can be a little more masculine and structured so the pinwheels added a touch of playfulness for a little girl's party.


We did have a few problems dealing with the heat and humidity in Kansas City.  When melting chocolate, you cannot get any water in it or it seizes up and gets hard.  There is so much moisture in the air our chocolate stays really thick.  The problem with this is the pops are hard to dip and the chocolate won't drip off which makes it too heavy for the pop.  I used a toothpick to scrape some of the chocolate but that changed the shape of some of the pops.  They weren't perfectly round which drove me a little crazy!

Even with our obstacles these turned out to be one of our favorite displays!


We are working on business cards but made this label for the back of the display.


  As a reminder that we do more than just pops, check out this cute wreath we made!  We will be making more of these in the future with different color schemes as it was a fun project!


Friday, June 22, 2012

A Toy Story Challenge!


When Megan originally asked me to take on the TS3 cake pop birthday party order I have to admit I was a little weary.  She was going to be out of town in Germany so I was going to have to face the challenge myself.  I got myself geared up and decided "What the heck!  I like a good challenge!" However, there was still a small fear in me that things could turn out to be a huge disaster!  I decided it was extremely important to have a test run to make sure it was indeed possible.  I gathered all my fixings and let me tell you, there are a lot! A variety of Sprinkles, m&m's, Junior Mints, sunflower seeds & more.  I'm a bit of a perfectionist when it comes to this stuff so I went to just about every possible place I could to find the perfect mustache colored sunflower seed for Mr. Potato Head.  I think I got three different types but it ended up working great because one was perfect for the pig and one other perfect for the alien!  

The biggest challenge for me was, believe it or not, Ham.  I don't know why but the shape of his head was a bit hard to dip because of the uneven weight.  Although I did have a few cracks, the majority of them turned out okay.  For his ears, before the big dip, I stuck in pink sunflower seeds on each side.  I ended up finding some perfect black metallic sprinkles for his beady little eyes.  I broke up tiny heart sprinkles to achieve the pink in his ears and used a pink cake writing pen for his nostrils.  I'm not a big fan of the Wilton's writers, I have AmeriColor Gourmet writers and those work great! 


Mr.  Potato Head looks hard but I would have to say he's probably the easiest.  He just has a lot of steps.  Once dipped, you immediately add the popsicle stick arms, the tiny butterscotch chip nose, the pink large flat circle candy disc ears and the Junior Mint hat.  Once dry, I then took a tooth pick and added eyes, sunflower seed mustache and the m&m feet!  To get the eyelid effect, I dipped the tiny white discs in some excess chocolate.  You have to have patience for this, as it's very easy to mess it up.  


The Alien was a little tricky but I'm really happy with the results.  There are two keys things to make the aliens great a) buy the Wilton's candy melts in Vibrant Green & b) stick in the candy pieces BEFORE you dip the whole alien.  For his ears, again I used chocolate covered sunflower seeds (Trader Joe's has some that are the perfect shade of yellow/green) and for his antenna I found some green hard, thin licorice.  The dip takes patience because of the extra parts already on the cake, you really have to make sure everything is covered and the excess is gently taken off.  You can stick eyes on immediately and then after it's dry use your black gourmet marker for the mouth!  


The display turned out pretty cute.  Our hostess wanted a Sunnyside cardboard box.  Instead of using an actual box (I just thought it might be hard to find the perfect shape, plus worried about weight of pops), I bought two thick cardboard boxes with handles from the Target $1 bin, covered them with kraft paper and painted on Sunnyside.  I liked the idea of a banner so I cut out circles and bought some red glitter letters from Michael's.  

This project was time consuming but I do think they turned out great and it definitely boosts your confidence in cake pop making!  


Wednesday, June 20, 2012

New Venture

Well, we finally decided to take the plunge and create a blog and Facebook page showing what we do!  That is creating cute cake pops, party decor and more in the Kansas City area.  We also ship depending on the customer's needs.

In honor of the upcoming holiday, Molly and I created a red, white and blue basket for Flury-Hinderks Insurance Agency.


It's great having Molly in town now to combine our creative efforts!  My husband is pleased to as he no longer has to give me his opinion on which ribbon I should go with, etc.!


We are already filling our schedule with 4th of July orders so message us soon to get your orders filled!


And don't forget, we do party decorations too.  The pops are just "icing on the cake" for a fabulous party!